Table of Contents


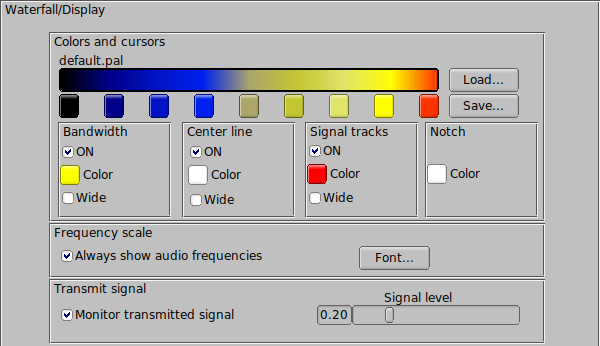
The waterfall palette or color scheme can be altered to suit your personal tastes and visual needs. When fldigi is first started it creates a wide range of pre-built palettes in the $HOME/.fldigi folder. The "Load" button gives you access to those palettes. You may change any palette by clicking on the various color buttons beneath the palette sample. A color picker opens for you to select the color by various means including specifying the RGB values. If you create a palette that suits you better than any of the prebuilt ones you can "Save" the palette.
The waterfall cursor is a set of markers on the frequency scale that are spaced a signal bandwidth apart. You canadd a pair of lines that drop down from those two markers for the full height of the waterfall by selecting Cursor BW. You can add a center line cursor to this pair of BW line by selecting Cursor Center line. You can also add a set of BW lines that straddle the received signal tracking point by selecting Bandwidth tracks. All three of these options are color selectable. Click on the colored button below the check box and a color selection dialog will open.
The frequency scale defaults to RF frequency. You can select to show audio frequencies.
You can monitor the transmitted audio waveform and also set the level of the monitored signal. This IS NOT your final transmitted signal!
Fldigi can set a notch from the waterfall when used with flrig and a transceiver that supports CAT control of a manual notch filter. When the notch is engaged a dotted vertical line is placed on the waterfall at the notch location. You can configure the color of the dotted notch indicator.
FFT Waterfall

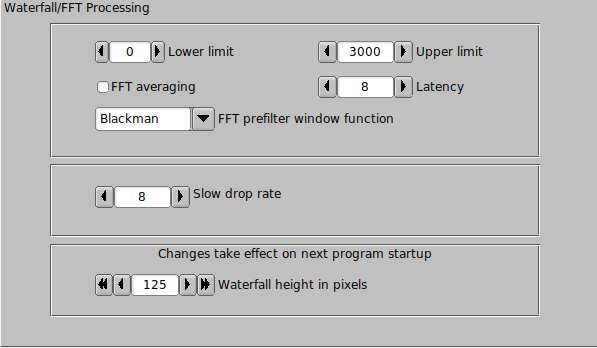
You can extinguish the display of received signals below a particular audio frequency.
Fldigi's waterfall FFT has a bin size of 1 Hz. With an FFT of 8192 and a sampling rate of 8000 it takes almost a second to accumulate enough data to perform the full FFT. A waterfall that dropped at one scan line per second would be hard on the viewer, so fldigi uses a first-in-first-out (FIFO) 8192 byte buffer for the FFT data. 512 byte audio blocks move through the buffer with each successive read of the sound card. The full buffer of 8192 samples is used to compute the FFT. That means that data in the FFT can have a latency of 8 scans. This provides excellent frequency resolution but poor time resolution (the vertical waterfall appearance). The latency control allows you to select the number of 512 byte blocks that are used for the FFT. The default latency is set to 4. You should be able to achieve a reasonable compromise between the time and frequency domain resolutions.
FFT averaging can be used to smooth the waterfall display in the frequency domain.
The FFT Prefilter or window function is used to reduce aliasing in the FFT computation.
The default prefilter for the Fast Fourier Transform associated with the waterfall is Blackman. You can try the other windowing filter. Under some conditions you might prefer one of those. The Blackman window has proven best for my setup.
Waterfall Mouse Behavior

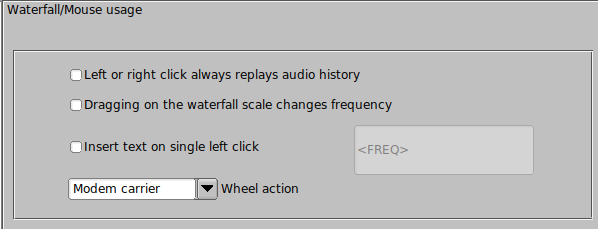
The mouse behavior in the waterfall panel can be controlled to suit your particular operating style. You might want to replay the saved audio history every time you either left click to select or right click to preview a particular signal. You can move the transceiver frequency in increments of 100 Hz by dragging the waterfall scale. You can also choose to insert a line of text into the Rx panel each time you left click a waterfall signal. The text can include expandable macro tags.
Waterfall Mouse Behavior Tailoring
The mouse wheel behavior can also be tailored to your liking:
- None - no mouse wheel activity in waterfall panel
- AFC range or BW - adjust the AFC range/BW up/down
- Squelch level - adjust the squelch level up/down
- Signal search - search up / down for next signal in current mode
- Modem carrier - adjust the audio tracking point +/- Hz increments
- Modem - select modem type from a full rotary of available modems
- Scroll - move the waterfall left/right in 100 Hz increments (for 2x, 4x expanded waterfall view)